之前学校里实训的小项目,我们小组做的安卓端,但是用安卓(AS)通过Jdbc连接本地数据库的时候(因为最后会想要把数据库放到云服务器上,所以没有直接考虑用android自带的数据库SQLLite)老是出错连接不上,于是疯狂心态炸裂。多谢之后看到的几篇博客(详见 参考博文 )帮助,逐渐解决了问题。虽然事后看起来都是些小问题,但一不注意确实是满满的坑和套路啊。所以决定写个博记录下我们小组的踩坑经历(同时给咱的小组说句大家都辛苦啦~ )
安装配置MySQL环境
这里我用的是mysql(5.6版),安装包和教程以及对应的一会会用到的mysql-connector-java-5.6-bin.jar都上传百度网盘了,如果需要的小伙伴可以点击
链接下载
提取码:0whm
附上明文链接:https://pan.baidu.com/s/1M7j6yPav5-kRF2fCxZ5Rxg
放上链接二维码:

详细的MySql的安装我就不再赘述了,链接里的文档中有的。
配置mysql配置文件
在配置文件中末尾增加
bind-address=0.0.0.0
然后重新启动mysql服务(右键我的电脑,管理,服务,找到mysql,右键重启),执行service mysql restart。
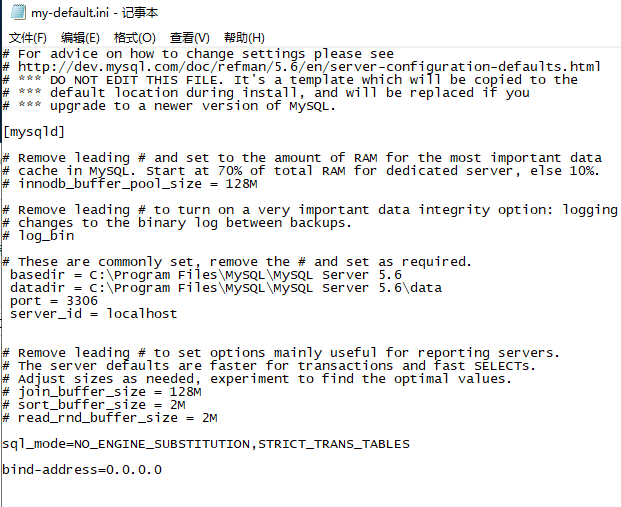
这样主要是让外部可以访问到Mysql,因为安卓虚拟机是非本地的实际上,所以之前我们连不上的主要原因也在这。
关于更多的配置Mysql的外网访问权限的配置,请参照cxin917博主的设置Mysql5.6允许外网访问详细流程 博客内容
同时,也特别感谢博文内容让我们小组摆脱了连接本地数据库无法连接上的噩耗,项目才顺利完成
创建测试用的数据库和表
创建测试用的数据库和表,数据内容如下

项目具体操作
AS创建demo项目Mysql
需要说一声的是,这里我用的是AS(Android Studio)来写的项目。创建了一个叫mysql的项目,没什么要注意的,基本默认
添加权限
给demo添加网络访问权限,添加到//android program/app/src/main/AndroidManifest.xml中:
1
| <uses-permission android:name="android.permission.INTERNET"/>
|
AndroidManifest.xml文件的详细内容:
1
2
3
4
5
6
7
8
9
10
11
12
13
14
15
16
17
18
19
20
21
22
23
| <?xml version="1.0" encoding="utf-8"?>
<manifest xmlns:android="http://schemas.android.com/apk/res/android"
package="com.example.mysql">
<uses-permission android:name="android.permission.INTERNET"/>
<application
android:allowBackup="true"
android:icon="@mipmap/ic_launcher"
android:label="@string/app_name"
android:roundIcon="@mipmap/ic_launcher_round"
android:supportsRtl="true"
android:theme="@style/AppTheme">
<activity android:name=".MainActivity">
<intent-filter>
<action android:name="android.intent.action.MAIN" />
<category android:name="android.intent.category.LAUNCHER" />
</intent-filter>
</activity>
</application>
</manifest>
|
添加jar连接包
把在上面的连接中下载下来的mysql-connector-java-5.6-bin.jarj包导入到项目中(ctrl c+v 就可以了)的lib文件夹下面,再右键Add As Library 进行导入。
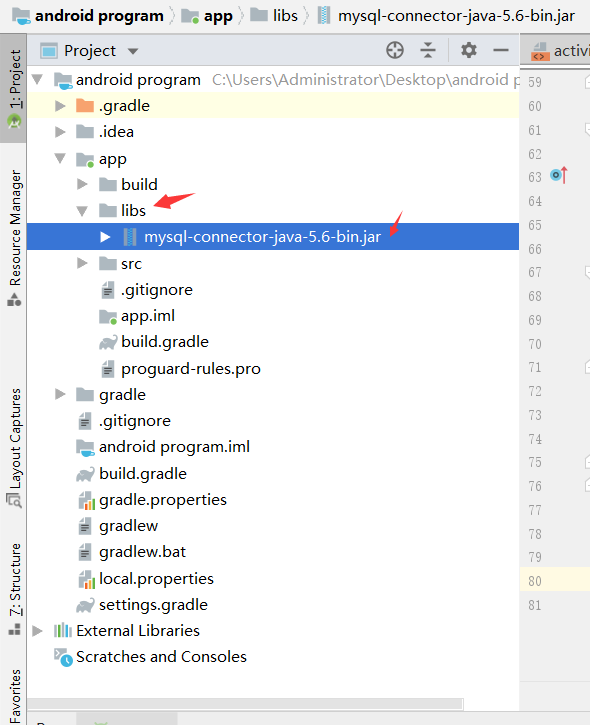
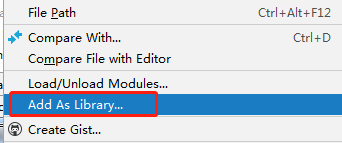
如果结果在app下的build.gradle中有如下的依赖,那么说明你添加对了:

创建连接数据库的类
创建 DBUtils类,用来连接数据库以及查询数据库内数据
需要注意的是,在Android开发中通过localhost或127.0.0.1访问本地服务器时,如使用http访问时,会报java.net.ConnectException: localhost/127.0.0.1:3306 -Connection refused异常。
原因:Android模拟器本身把自己当做了localhost或127.0.0.1,而此时我们又通过localhost或127.0.0.1访问本地服务器,所以会抛出异常了。
=====>在模拟器上可以用10.0.2.2代替127.0.0.1或localhost即可正常访问或调试
在这里特别感谢auasoft博主提供的参考
1
2
3
4
5
6
7
8
9
10
11
12
13
14
15
16
17
18
19
20
21
22
23
24
25
26
27
28
29
30
31
32
33
34
35
36
37
38
39
40
41
42
43
44
45
46
47
48
49
50
51
52
53
54
55
56
57
58
59
60
61
62
63
64
65
66
67
68
69
70
71
72
73
74
75
76
77
78
79
80
| package com.example.mysql;
import android.util.Log;
import java.sql.Connection;
import java.sql.DriverManager;
import java.sql.PreparedStatement;
import java.sql.ResultSet;
import java.util.HashMap;
public class DBUtils {
private static String driver = "com.mysql.jdbc.Driver";// MySql驱动
private static String user = "root";// 用户名
private static String password = "";// 密码
private static Connection getConn(String dbName){
Connection connection = null;
try{
Class.forName(driver);// 动态加载类
Log.i("myql","驱动加载成功!");
String url = "jdbc:mysql://10.0.2.2:3306/"+dbName+"?useSSL=FALSE";
connection = DriverManager.getConnection(url, user, password);
Log.i("mysql","数据库连接成功!");
}catch (Exception e){
e.printStackTrace();
}
return connection;
}
public static HashMap<String, Object> getInfoByName(String name){
HashMap<String, Object> map = new HashMap<>();
// 根据数据库名称,建立连接
Connection connection = getConn("mydb");
try {
// mysql简单的查询语句。这里是根据mytable表的username字段来查询某条记录
String sql = "select * from mytable where username= ?";
if (connection != null){// connection不为null表示与数据库建立了连接
PreparedStatement ps = connection.prepareStatement(sql);
if (ps != null){
// 设置上面的sql语句中的?的值为name
ps.setString(1, name);
// 执行sql查询语句并返回结果集
ResultSet rs = ps.executeQuery();
if (rs != null){
int count = rs.getMetaData().getColumnCount();
Log.e("DBUtils","列总数:" + count);
while (rs.next()){
// 注意:下标是从1开始的
for (int i = 1;i <= count;i++){
String field = rs.getMetaData().getColumnName(i);
map.put(field, rs.getString(field));
}
}
connection.close();
ps.close();
return map;
}else {
return null;
}
}else {
return null;
}
}else {
return null;
}
}catch (Exception e){
e.printStackTrace();
Log.e("DBUtils","异常:" + e.getMessage());
return null;
}
}
}
|
前端
写了一个按钮和一个文本框,点击按钮进行数据库查询操作,查询结果放到文本框组件进行展示
1
2
3
4
5
6
7
8
9
10
11
12
13
14
15
16
17
18
19
20
21
22
23
24
25
26
27
| <?xml version="1.0" encoding="utf-8"?>
<LinearLayout xmlns:android="http://schemas.android.com/apk/res/android"
xmlns:app="http://schemas.android.com/apk/res-auto"
xmlns:tools="http://schemas.android.com/tools"
android:orientation="vertical"
android:layout_width="match_parent"
android:layout_height="match_parent"
tools:context=".MainActivity">
<Button
android:id="@+id/btn_get_data"
android:layout_margin="2dp"
android:textSize="16sp"
android:text="获取数据测试"
android:layout_width="match_parent"
android:layout_height="wrap_content" />
<TextView
android:id="@+id/tv_data"
android:padding="10dp"
android:textSize="16sp"
android:gravity="center"
android:text="zoey"
android:layout_width="match_parent"
android:layout_height="wrap_content" />
</LinearLayout>
|
前端界面截图:

这里申明一下,前端完全是从邹奇的博客那复制过来的,非常感谢博主博客内容的提醒。后端的也是在这位博主的启发下改动的。再次感谢博主
MainActivity.java
这里要注意的是,查询数据库的操作属于耗时操作,Android会要求把这种操作放到子线程里面。同时,组件操作又必须是在主线程中去调用。所以,建议采用Handler消息处理的形式来解决这种要求关系。
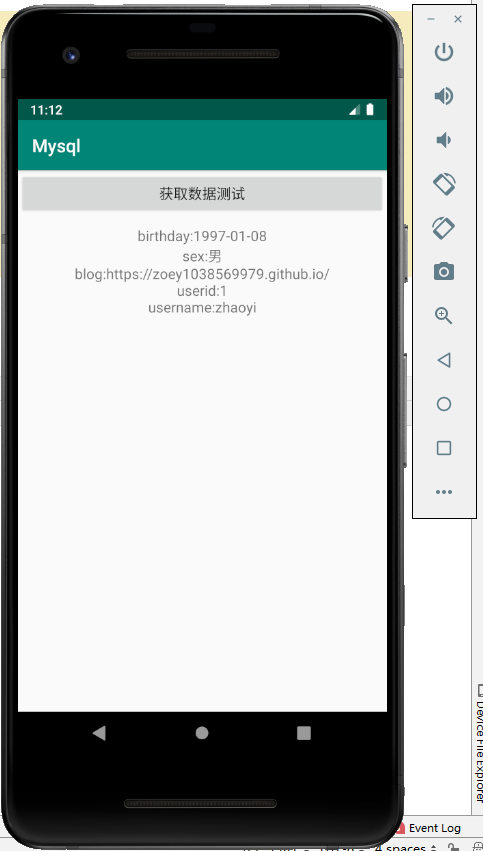
具体的代码内容如下(调用类,查询了username为zhaoyi的用户信息):
1
2
3
4
5
6
7
8
9
10
11
12
13
14
15
16
17
18
19
20
21
22
23
24
25
26
27
28
29
30
31
32
33
34
35
36
37
38
39
40
41
42
43
44
45
46
47
48
49
50
51
52
53
54
55
56
57
58
59
60
61
62
63
64
65
66
67
68
69
70
71
72
73
74
75
76
77
78
79
80
| package com.example.mysql;
import androidx.annotation.NonNull;
import androidx.appcompat.app.AppCompatActivity;
import android.os.Bundle;
import android.os.Handler;
import android.os.Message;
import android.util.Log;
import android.view.View;
import android.widget.Button;
import android.widget.TextView;
import android.widget.Toast;
import java.sql.Connection;
import java.util.HashMap;
public class MainActivity extends AppCompatActivity {
private Button test4mydql;
private Thread mydql;
private Handler mHandler;
private String s;
@Override
protected void onCreate(Bundle savedInstanceState) {
super.onCreate(savedInstanceState);
setContentView(R.layout.activity_main);
test4mydql=(Button)findViewById(R.id.btn_get_data);
test4mydql.setOnClickListener(new View.OnClickListener() {
@Override
public void onClick(View view) {
test();
}
});
}
private void test(){
mydql=new Thread(new Runnable() {
@Override
public void run() {
HashMap<String, Object> map = DBUtils.getInfoByName("zhaoyi");
Message message = new Message();
if(map != null){
s="";
for (String key : map.keySet()){
s += key + ":" + map.get(key) + "\n";
}
message.what = 1;
message.obj = s;
}else {
message.what = 0;
message.obj = "查询结果为空";
}
// 发消息通知主线程更新UI
mHandler.sendMessage(message);
}
});
mydql.start();
mHandler=new Handler(){
@Override
public void handleMessage(@NonNull Message msg) {
super.handleMessage(msg);
if (msg.what == 0)
Log.i("mysql","查询失败");
else if(msg.what == 1){
TextView tv=findViewById(R.id.tv_data);
tv.setText(s);
Log.i("mysql","查询成功");
}
mHandler.removeCallbacks(mydql);
Log.i("mysql","查询数据库的线程结束");
}
};
}
}
|
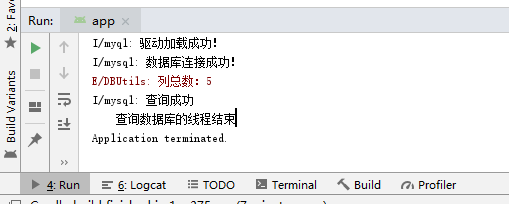
运行结果截图
参考博客
博主 auasoft 的Android本地默认IP
博主 邹奇 的Android中连接MySql数据库获取数据的简单实现
博主 cxin917 的设置Mysql5.6允许外网访问详细流程


